Showing posts with label TUTORIAL. Show all posts

Tuesday, June 16, 2020

Eye and Wig Swap, Wellie Wisher Ashlyn


Doing an eye and wig swap on Wellie Wisher Ashlyn.
You need a cup of water at 200 degrees. This will soften the vinyl and you'll be able to pop the eyes out easily, and pop the new eyes back in.

Get a plastic bag with no holes and tick the head inside the bag. Stick the doll head in the water for 2-3 minutes.


Check to see if the vinyl is soft enough to squeeze the head small enough to pop out the eyes. If not you will need to soak the head in the warmed water a little more.


Here she is with decal eyeliner. Her name is Maria!

Tuesday, May 19, 2020

DIY American Girl Dog House Tutorial


Buddy needs a dog house. Plain and simple.
I love working with the USPS boxes. This one is 6" x 7" x 7"

You can decorate your dog house with paint, scrapbook papers, foam sheets or in our case - popsicle sticks! 


For the top, we left the front flap un-taped in order to create an A-Line roof. After taping the box together, we cut a door out in the center.


Cutting the curved edges off every popsicle stick will create flat edges. We lined them up to size, hot glued them on to the front then trimmed the frame with popsicle sticks.


Here's an example of scrapbook paper glued to the sides.


Once the dog house is done, we glued felt onto the floor inside.


We chose to paint the house with acrylic paint in a true sky blue with white trim.


Tuesday, May 12, 2020

BOREDOM BUSTER: Learn to Draw Scoob!


You can draw Scoob!


source: SCOOB!

Friday, November 1, 2019

*FEATURE* Addy Bakes: Cherry Flag Pie Recipe


Ingredients


Crust

  • 2 cups all-purpose flour
  • 1 tablespoon granulated sugar
  • 1/2 teaspoon salt
  • 3/4 cup cold unsalted butter, cut into 1⁄2-inch cubes
  • 1/4 cup cold vegetable shortening
  • 4-5 tablespoons ice water


Filling

  • 3 pounds fresh Bing cherries, pitted and halved
  • 1/2 cup granulated sugar
  • 1/4 cup cornstarch
  • 1 teaspoon vanilla extract
  • 1/8 teaspoon salt

Additional Ingredients

  • 1 large egg yolk
  • 2 teaspoons water
  • 1 tablespoon turbinado sugar


How to Make It


Prepare the Crust: Place flour, sugar, and salt in bowl of a food processor; pulse until combined, 3 to 4 times. Add butter and shortening; pulse until mixture resembles small pebbles, 4 to 5 times. Sprinkle 4 tablespoons of the water over top, and pulse until mixture becomes a shaggy mass, adding additional water, 1 teaspoon at a time, as necessary.


Transfer mixture to a lightly floured surface, and knead until mixture comes together, 3 to 4 times. Divide into 2 pieces (making two-thirds of the dough the first piece and the remaining one-third of dough the second piece). Shape each piece into a disk. Cover each with plastic wrap, and chill 1 hour.


Preheat oven to 400°F. Prepare the bottom Crust: Roll larger disk of dough on a lightly floured work surface into a 12-inch circle, and place into a 9-inch deep-dish pie plate. Fold edge of dough under rim of pie plate. Chill until ready to use.


Prepare the Filling: Combine cherries, sugar, cornstarch, vanilla, and salt in a large bowl, stirring well. Transfer mixture to prepared 

Crust

Prepare the top Crust: On a sheet of lightly floured parchment paper, roll remaining disk of dough into a 10-inch circle. Use a paring knife to cut 2 (1-inch-wide) strips from the bottom one-third of the dough, leaving a semicircle of dough on top. Use a 3⁄4-inch star-shaped cutter to cut out stars from the left half of the dough semicircle. Use a paring knife to cut out and remove 3 (1-inch-wide) strips of dough from the right half. Use the parchment to carefully transport and place the prepared semicircle on top of Filling. Place the 2 (1-inch-wide) strips across the uncovered Filling at the bottom of the pie to complete the flag design. Crimp the dough edges.


Whisk together egg yolk and water. Brush entire piecrust with egg mixture. Sprinkle with turbinado sugar. Place pie on a baking sheet lined with aluminum foil.


Bake in preheated oven on lower oven rack 20 minutes. Leaving pie in oven, reduce oven temperature to 350°F, and bake 55 to 60 minutes, until Crust is golden and Filling is bubbly throughout, shielding pie with aluminum foil to prevent overbrowning after 20 to 30 minutes, if needed. Transfer pie from baking sheet to a wire rack, and cool at least 2 hours before serving.

Source: Southern Living 

Tuesday, October 22, 2019

*FEATURE* Cape & Crown Tutorial - A Girl for All Time

Are you ready for Halloween? These gorgeous capes and crowns are easy to make - and fun to decorate. 


Try our tutorial on how to make a doll size cape and crown. Your doll can be whatever you imagine - A King or a Queen, Viking Hero or a Superhero! It all depends on how you decorate them.

Monday, September 30, 2019

HTM Mouse Ears for 18" Dolls

 I have been asked about my doll sized mouse ears. You can make your own headband mouse ears for your 18" doll. The how to is below. However, my mouse ears are from the Disney Store. There are currently six different style ornaments available to choose from.


These are the ears I have, only Minnie Mouse.


  • 1/4 of a yard fabric
  • 2 inch styrofoam discs
  • 1 headband
  • 1 bow (or fabric to make a bow)
  • Hot Glue Gun
  • Scissors
Cover your headband in fabric or trim.
Cover your ears with fabric, tucking the edges. 
Glue them onto your headband.
Add a bow to the center.


Disney Parks is now selling mini ears $16.99 


Tuesday, September 17, 2019

*FEATURE* Sam, London Fashion Week + FREE Ginsberg Cat

Sam wants to be a fashion designer when she grows up and what better place to check out the latest trends than on Carnaby Street in London? It was once the hottest place to find the coolest designs in the 1960s and today is still a great place to find clothes and fashion ideas. This is the end of London fashion week, so why not celebrate with Sam and make your own doll size shopping bag?


Watch the tutorial video!

For LADL readers, we are offering a FREE Ginsberg cat with every purchase of Sam, Your 1960s Girl! 

Just use LADLcat at checkout when you add Sam and Ginsberg her cat to your basket. Valid until Sept 24.

Friday, July 26, 2019

DIY Unicorn Hairstyle

Creating a Unicorn Hairstyle for your Doll and girl, for Summer Camp or summer adventure. 

Items you will need: 
  • toilet paper tube, or whatever you have available to make a cone shape. My cone shape is 2” tall, 1” diameter on the bottom and 3/4” diameter on the top 
  • small hair elastic 
  • bobby pins (as many as you need to secure hair) 
  • ribbon long enough to match the hair length or a little longer. My ribbon is 14” long.  
  • decorative hair elastic or barrette, anything that will cover up the ends 
  • hair brush and water bottle
 

 Brush out your dolls hair. Gather front hair into a pony tail on top of the head. Put the cone shape around the ponytail and tape the cone so it will stay in place.
Thread the ribbon through the cone and put under the hair elastic. 


Secure all or part of the hair to the top of the cone with a bobby pin. Wrap the hair around the cone shape, when you get to the bottom, secure in place with a bobby pin.You may have to adjust the hair so you don’t see the cone underneath. Wrap the ribbon around either with the hair or by itself. Add the the decorative hair elastic or barrette if you want.  My hair styling abilities are not as good as others, so give it a try. 

My daughter styled Saige’s hair using a taller cone shape. 

Monday, July 15, 2019

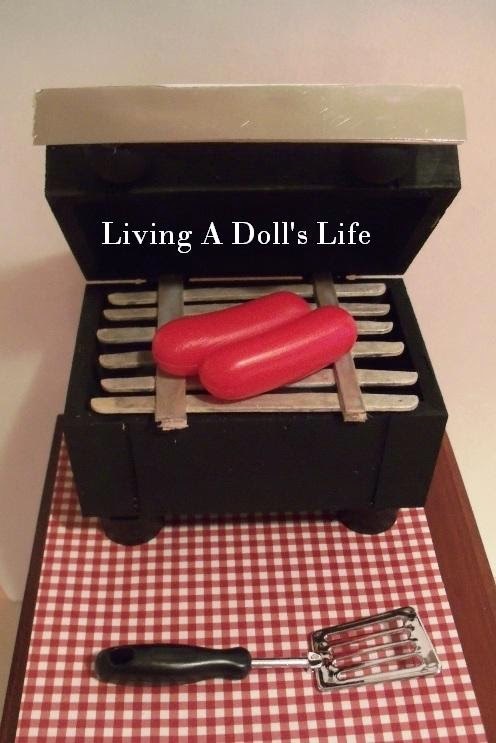
*Summer Camp* HTM - Camp Site Grill


Supplies:

  •    Wooden box
  •     Skinny sticks
  •     Black flat paint
  •     Metallic silver paint
  •     4 bottle caps or wooden feet
  •     Hot glue
  •     steel wool, cotton balls or black pom poms

First choose either a round top BBQ or a flat one.


 Paint the entire box black - inside / out.


Hot glue the feet onto the bottom then paint the caps or wooden feet black. 


I used bottle caps in my tutorial.


Begin hot gluing skinny sticks to create a grate, then paint the skinny sticks metallic silver.


Dollar Tree has aluminum Grill Toppers that are easy to cut and can be used in place of the skinny stick grate.


 Attach the large craft stick handle to the front of the lid with hot glue. You can use bottle caps to extend the handle out. I covered the craft stick in shiny scrapbook paper.
 
  
Cut steel wool to size for coals or use black poms poms.
In this tutorial I painted cotton balls.

It's time to GRILL!!!!